The "Tutorial" option is on the choice list although clicking on the button will get you to an appropriate page in this help/tutorial file.
Right clicking on the
![]() will
load a player for a set of MP3 files, but obviously you will need speakers
attached to your computer. We hopefully will be replacing the the speaker
files with full video help files in due course.
will
load a player for a set of MP3 files, but obviously you will need speakers
attached to your computer. We hopefully will be replacing the the speaker
files with full video help files in due course.
The Help files which have become extremely large over the years have placed on our web-site, and these are accessed whenever the option is selected. If you do not have access to a broadband internet connection, then please contact the Support Line and we will talk you through a configuration process which will access locally stored files. The only down side to this is that you will need to keep the files updated from our web-site.
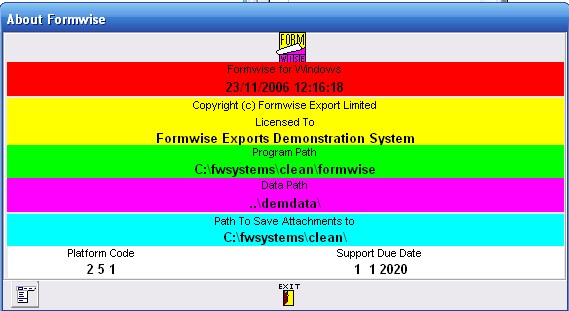
The
About
gives a screen showing details of the version of Formwise software you are running and where it is located, date and time stamp on the executable file you are running, and helps us when we have to check details whilst providing support. This can be seen displayed in the graphic below:-
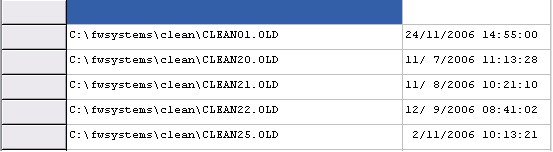
The document icon at the bottom left can also be clicked to reveal all the old update files to ensure that they are installed, the screen should be in the following format:-
The Debug option allows us to track what is happening if there is a problem with the system, and instructions will be given on the Support Line on how to find and report the errors..It may be that you would prefer to hand your computer to us via a program on the internet and if this is the case, then please do not hesitate to mention it.
The Formwise Download site will give you access to the correct location.
1. Formwise Export Web-site: for all the latest information from us,
2. Tate Freight Forms: for ordering any stationery requirements
3. HM Revenue & Customs: who also maintain the next site
4. UK Trade Information: for a wealth of data and directives on trade etc.
5. EU Applied Tariffs Database: for in depth tariff and trade information and statistics
6. Tate Freight Forms On-line Guide: This goes on-line in the autumn of this year and on the demonstration system we can take you only as far as the login screen. In the near future we hope to be able to set up the system to a subscriber's log-in data and thus you should only be three clicks away from a country data page.
7. Write E-cert: To allow communication with your Chamber of Commerce of Certificate of Origin data. For those users who wish to use the British Chambers of Commerce e-Cert options, there is a choice of options available, the EC and Arab certificates of origin with or without invoices. To read more about the service go to www.chamberonline.co.uk On the 1 November 2005, a further development of e-Cert was launched called e-Cert eXpress. This new development allows the exporter to apply for a Certificate of Origin on line, the Chamber can now check, approve and stamp the Certificate of Origin electronically and return direct to the exporter on line, who then prints it out at their own premises.
2. a. in order to type the data into the web-site Log on to your Chamber web site from your PC and complete your application online, and allocate a CofO number from the original Certificate of Origin.
b. to feed the data from Formwise you should write out the file and then transfer it to the e-Cert server.
3. Submit your data and application form to your Chamber
9. C.I.A.: This gives fascinating details about countries from the Central Intelligence Agency
10. SITPRO: This site has a wealth of data and guidance for exporters and keeps you in touch with trade facilitation.
11. Business Link (International Trade): The government's preferred contact method, and the future site of the International Trade Single Window project
One point to note is that if you wish to add your own notes to the topics within this help file, then you should click on Edit and Annotate. A windows will open for you to add notes which when you save will display a paper clip in the top left corner. You can then click on this to display your notes.
toolbarhelpoptions - 290315